
Customize Smart/Simple Letter Paragraphs
Topic:
How Do I Change the Paragraphs on my Smart or Simple Letters?
Instructions:
Smart Letters and Simple Letters share the same paragraphs so changing the paragraphs in one will change them in the other. So it is best to use Simple Letters to preview your customizations even if you normally use Smart Letters to actually print your driver letters.
To customize the letter paragraphs go to the Reports page and click on Simple Letters to select it. Then in the left side of the page click Advanced. At the bottom click on the Paragraphs tab.
Each paragraph is used in different areas of the letter. You will see in the Violation paragraph that it includes [DriverName] in the beginning. That is the correct way to use the field designators.
There are several special field designators that can be used in the letter paragraphs.
The brackets [] around each entry are required. The designators are replaced by the data values for that field when the letter is printed. You can include any of these field designators in any of the paragraphs. Although they make more sense in some paragraphs than others.
Most of the items relate directly to information assigned on the Drivers page.
After you have made the desired changes to a paragraph you must click the Save button on the page. You can then Preview the letters to see your changes.
Fields:
RapidLog LITE is Processing Logs Slowly
Topic:
RapidLog LITE will be very slow processing logs and potentially say Not Responding at the top of the program.
Instructions:
- Go to the Logs page in RapidLog.
- Click the drop-down arrow at the top of the Violations List.
- Next click Audit When Saving Log to disable it.
- Click on the Audit button at the top of RapidLog.
- Note: Turning off Audit when Saving log will disable auditing a log when you move to the next day. This can speed up processing logs. Just make sure you go to the Audit page in RapidLog to run an audit before running reports.
- Click Start. This will audit any logs that you have entered.
Instructions with Images:
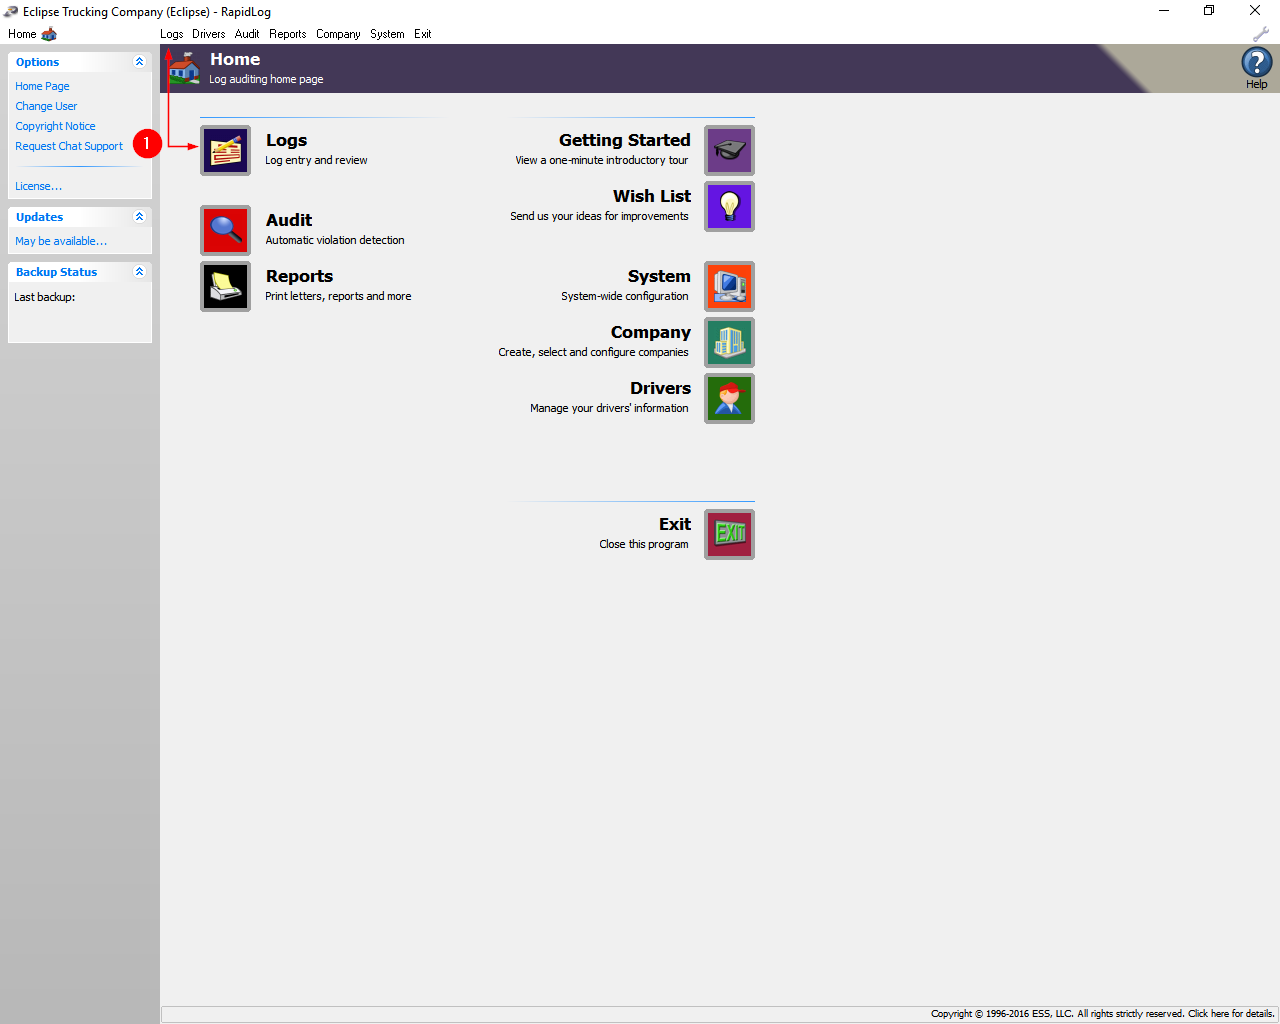
Step 1: Go to the Logs page in RapidLog.
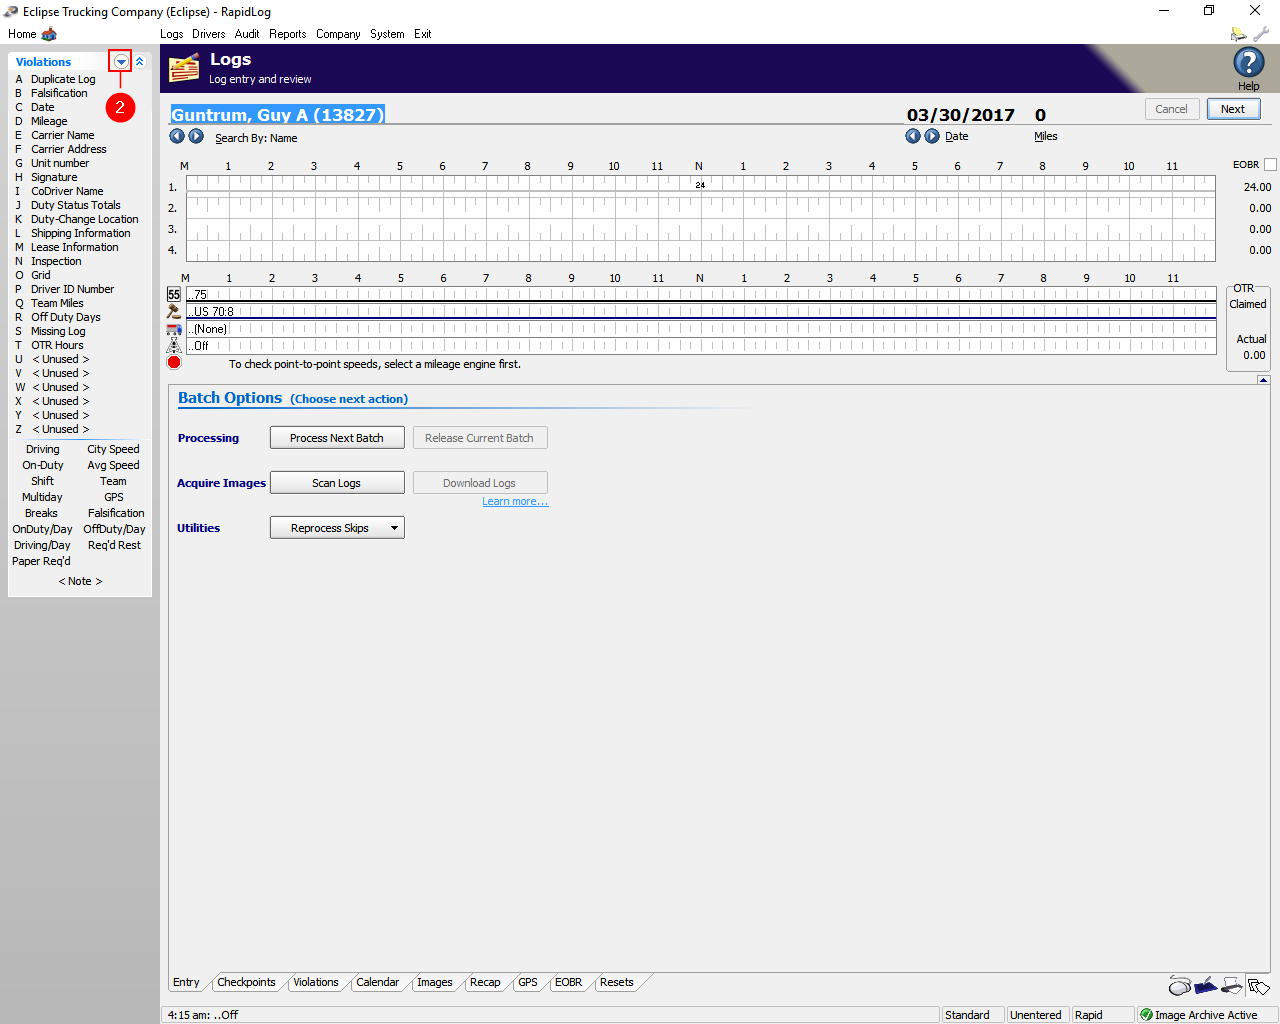
Step 2: Click the drop-down arrow at the top of the Violations List.
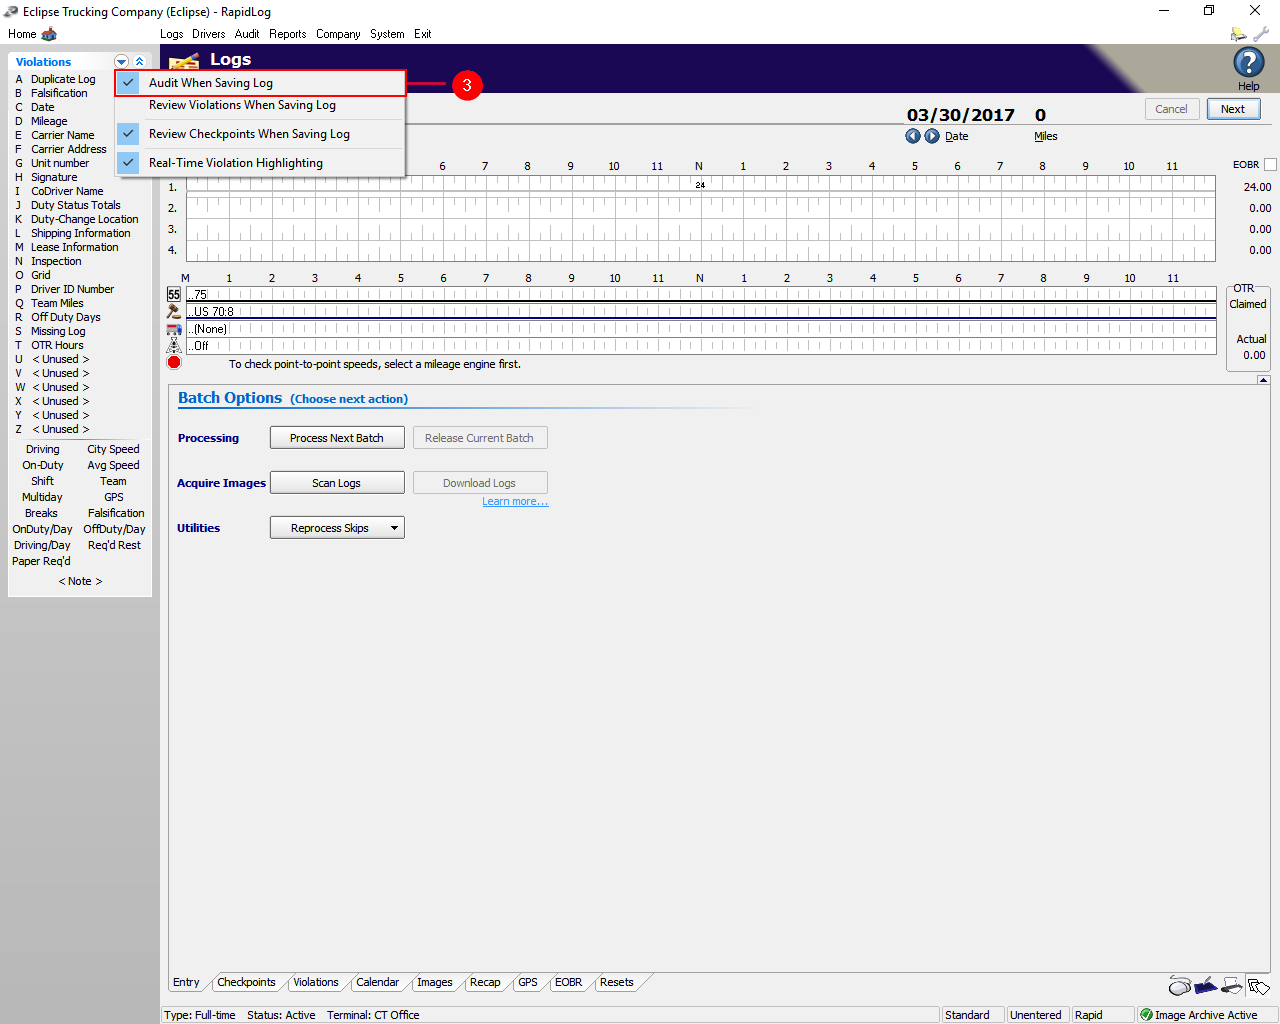
Step 3: Next click Audit When Saving Log to disable it.
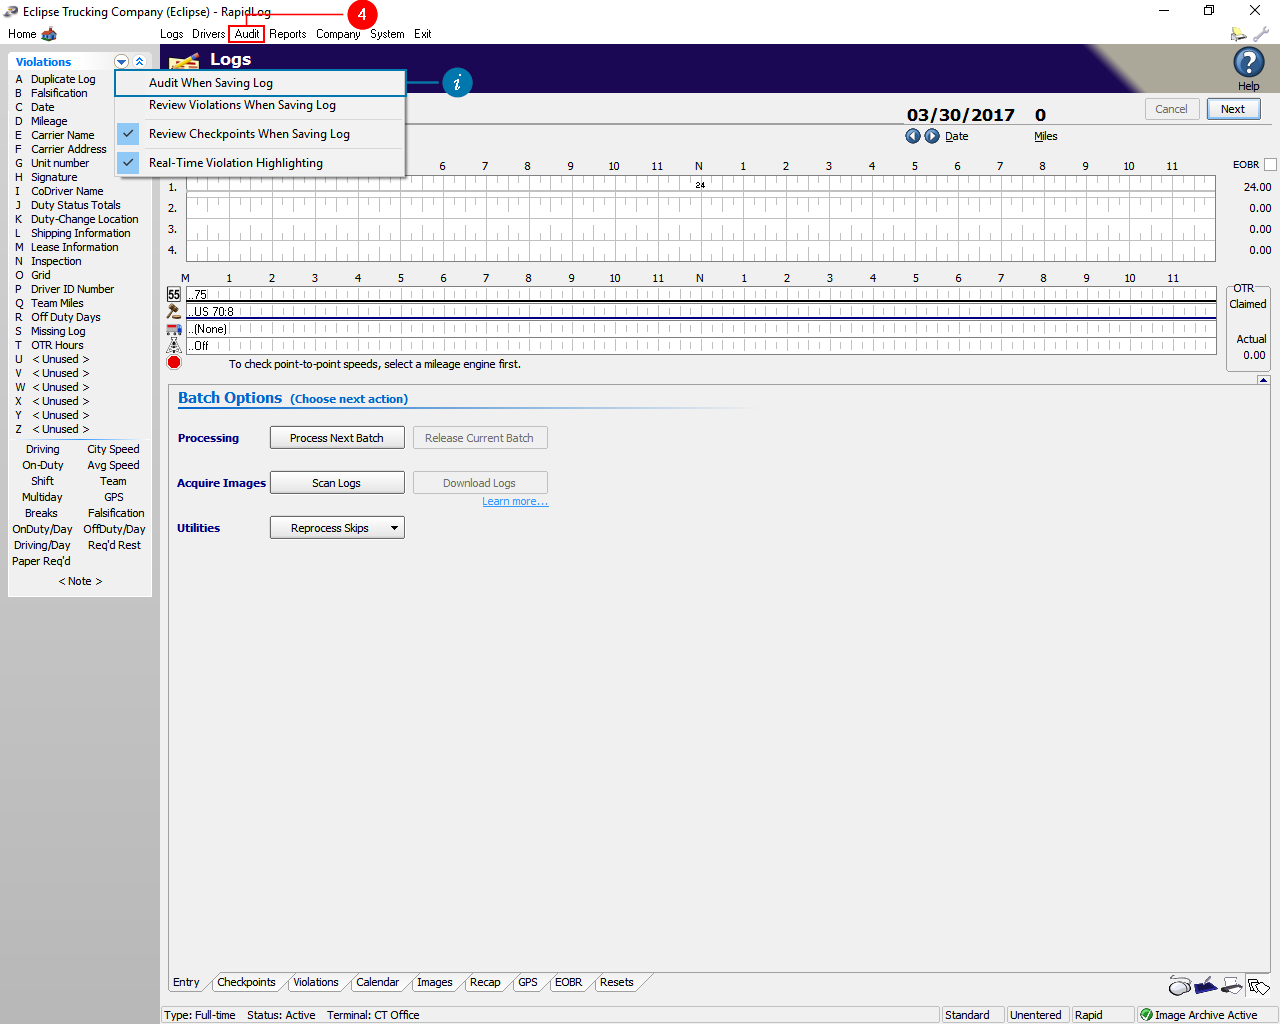
Step 4: Click on the Audit button at the top of RapidLog.
Info – Turning off Audit when Saving log will disable auditing a log when you move to the next day. This can speed up processing logs. Just make sure you go to the Audit page in RapidLog to run an audit before running reports.
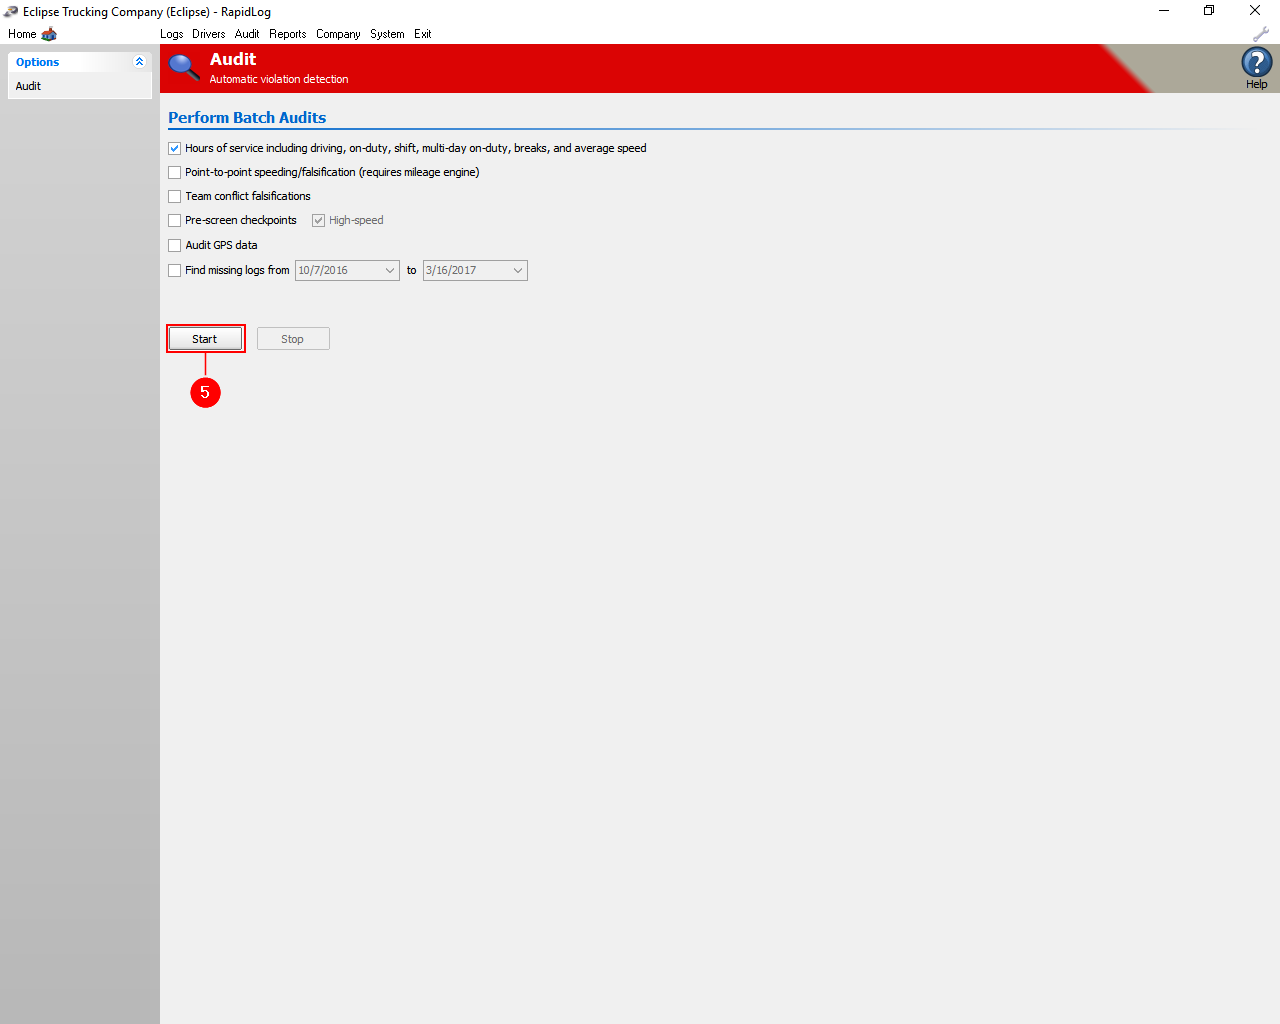
Step 5: Click Start. This will audit any logs that you have entered.
Deleting Logs
Topic:
How do I delete a Log entered in RapidLog?
Instructions:
- Go to the ‘Logs’ page in Rapidlog.
- Click on the ‘Images’ tab at the bottom.
- Info: Make sure you’re on the correct driver and date you want to delete.
- Click the ‘Wrench’ in the upper right.
- Then select ‘Delete Image’. If you do not see ‘Delete Image’, then click on the ‘Image’ tab at the bottom.
- Click the ‘Regular’ button at the bottom right, then select ‘Unentered’ to clear the log data.
- Info: You have other options besides ‘Unentered’ if you don’t need to fully remove the log.
Instructions with Images:
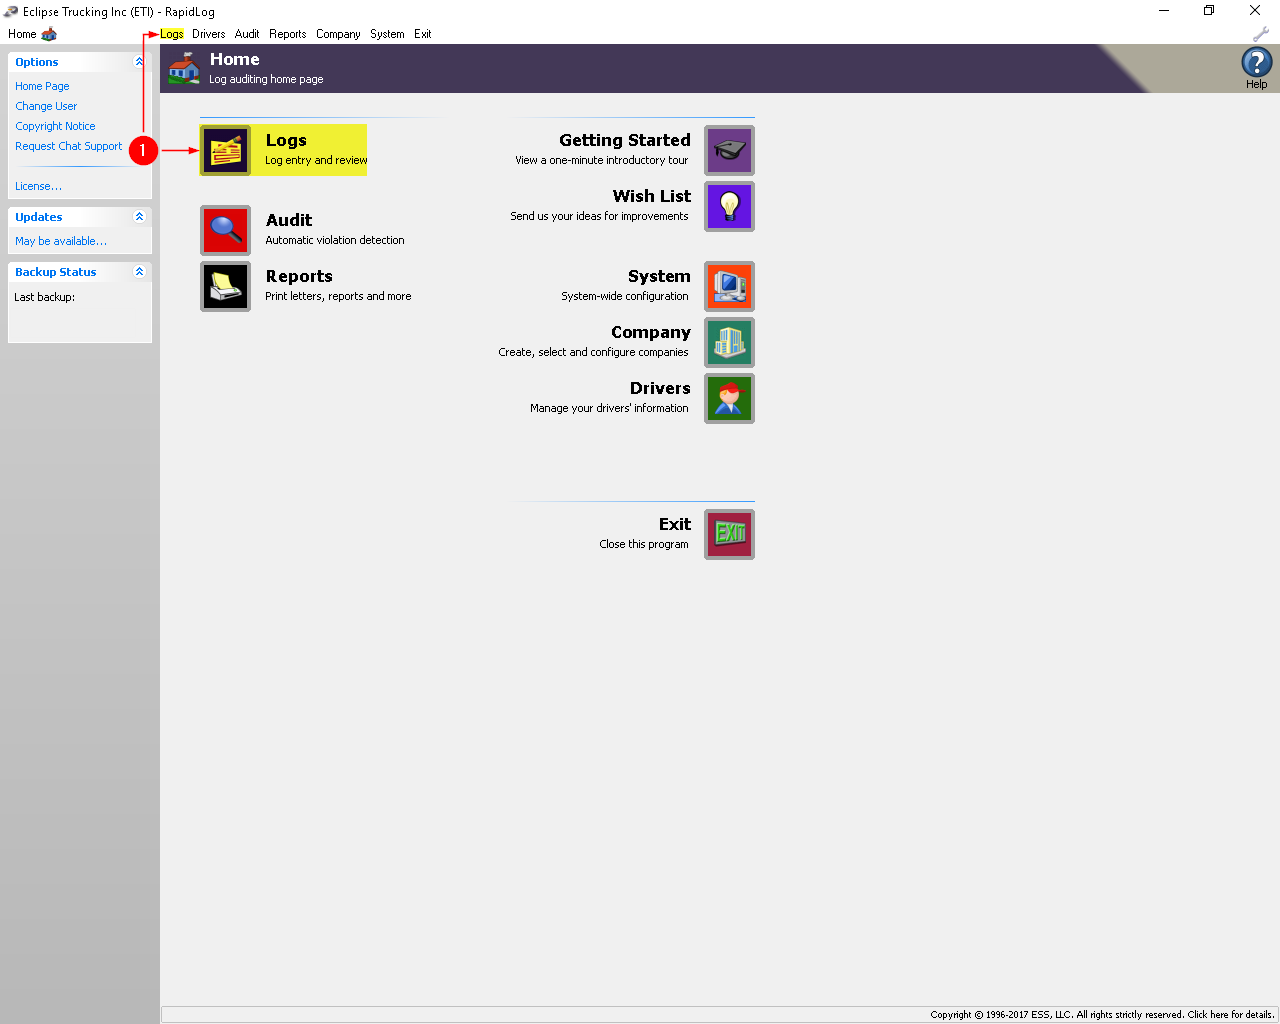
Step 1: Go to the ‘Logs’ page in Rapidlog.
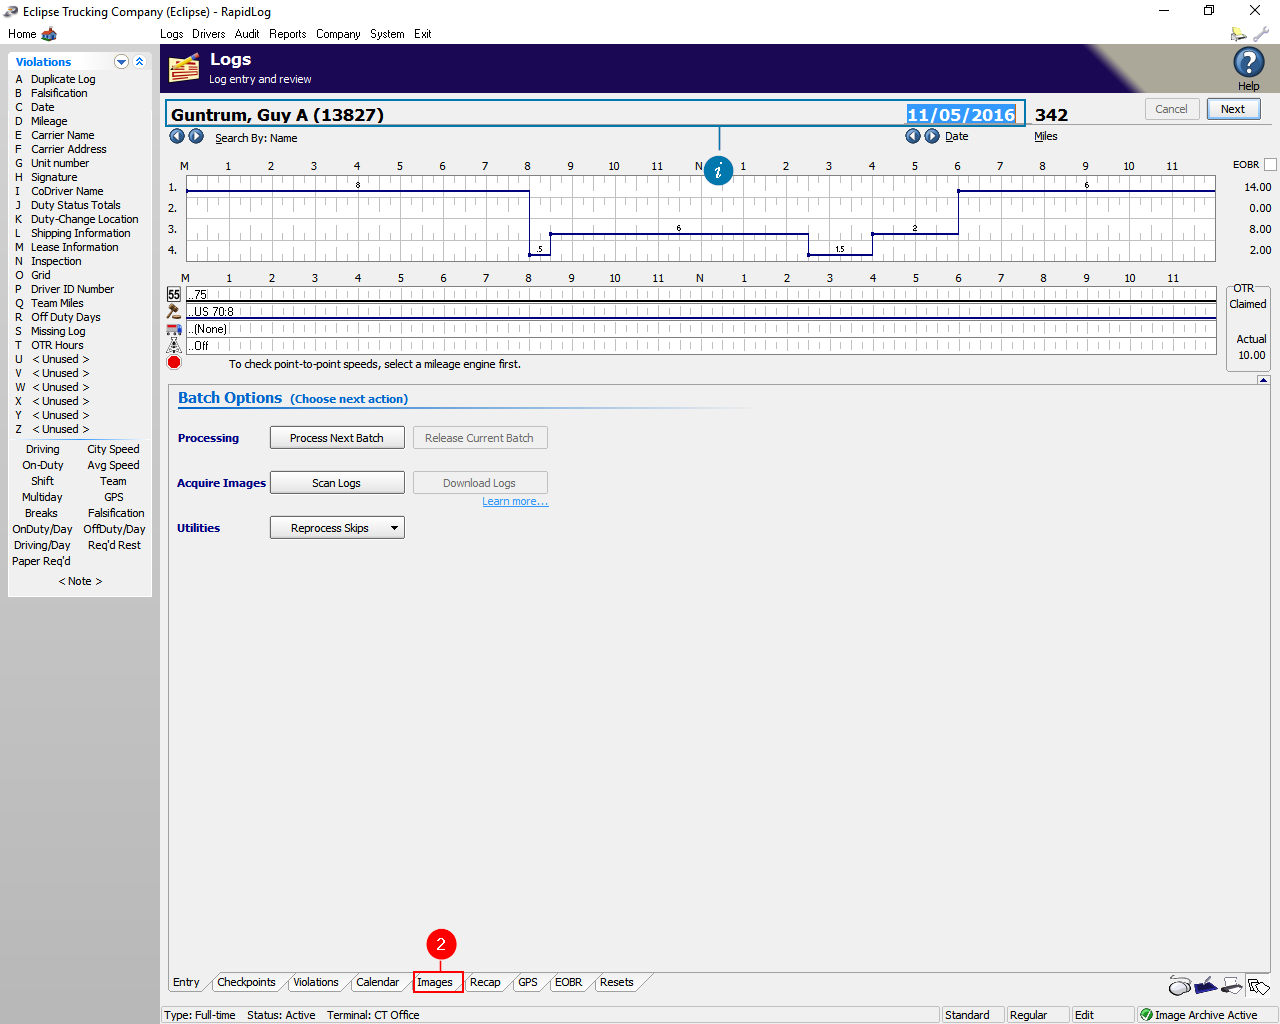
Step 2: Click on the ‘Images’ tab at the bottom.
Info: Make sure you’re on the correct driver and date you want to delete.
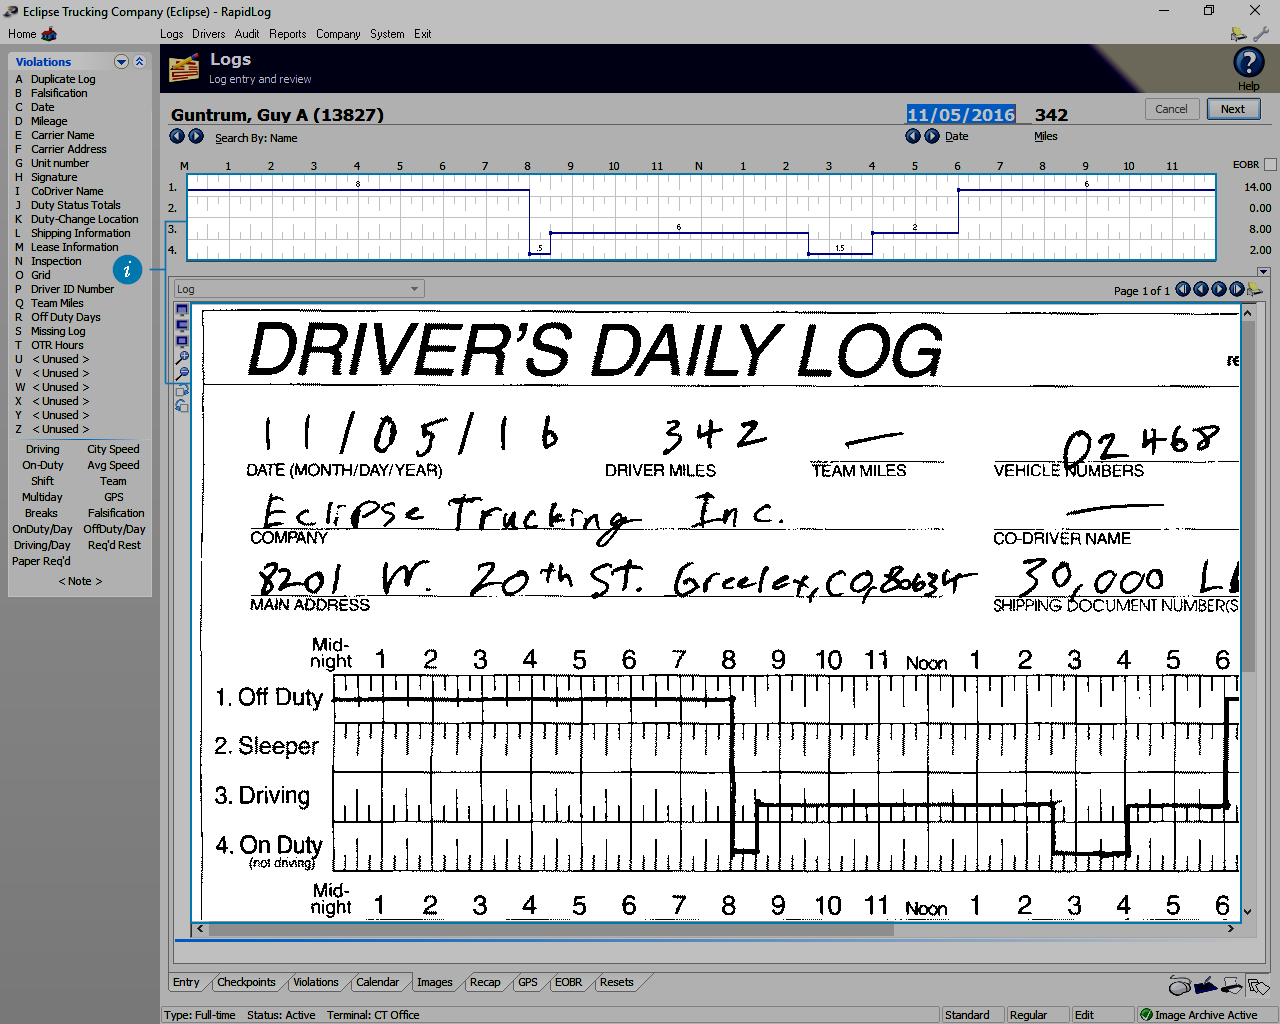
Info: There are two separate parts of data that need to be deleted. One is the image and the other is the grid data.
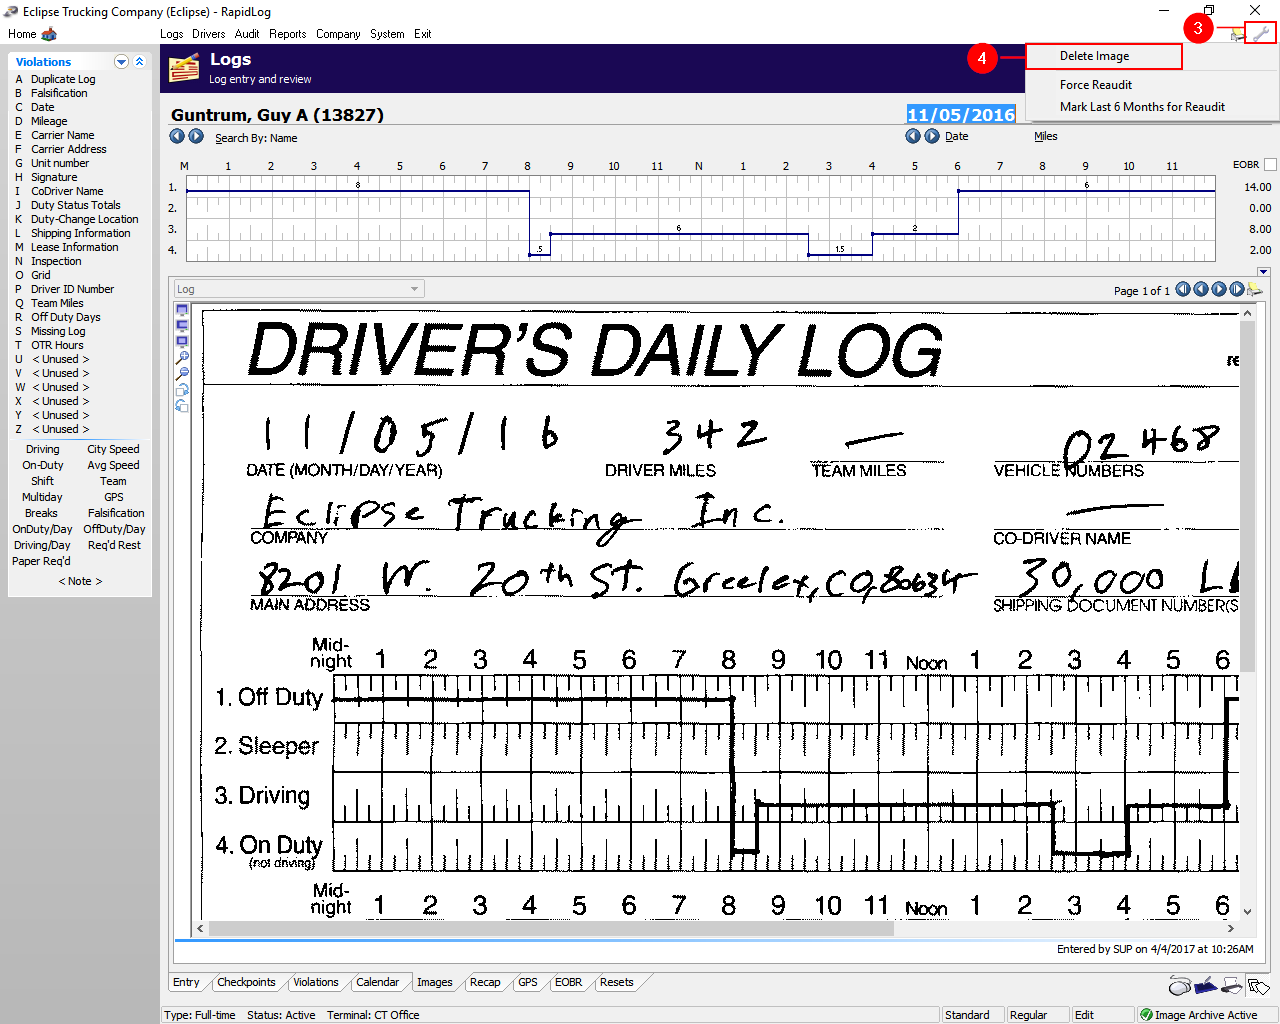
Step 3: Click the ‘Wrench’ in the upper right.
Step 4: Then select ‘Delete Image’. If you do not see ‘Delete Image’, then click on the ‘Image’ tab at the bottom.
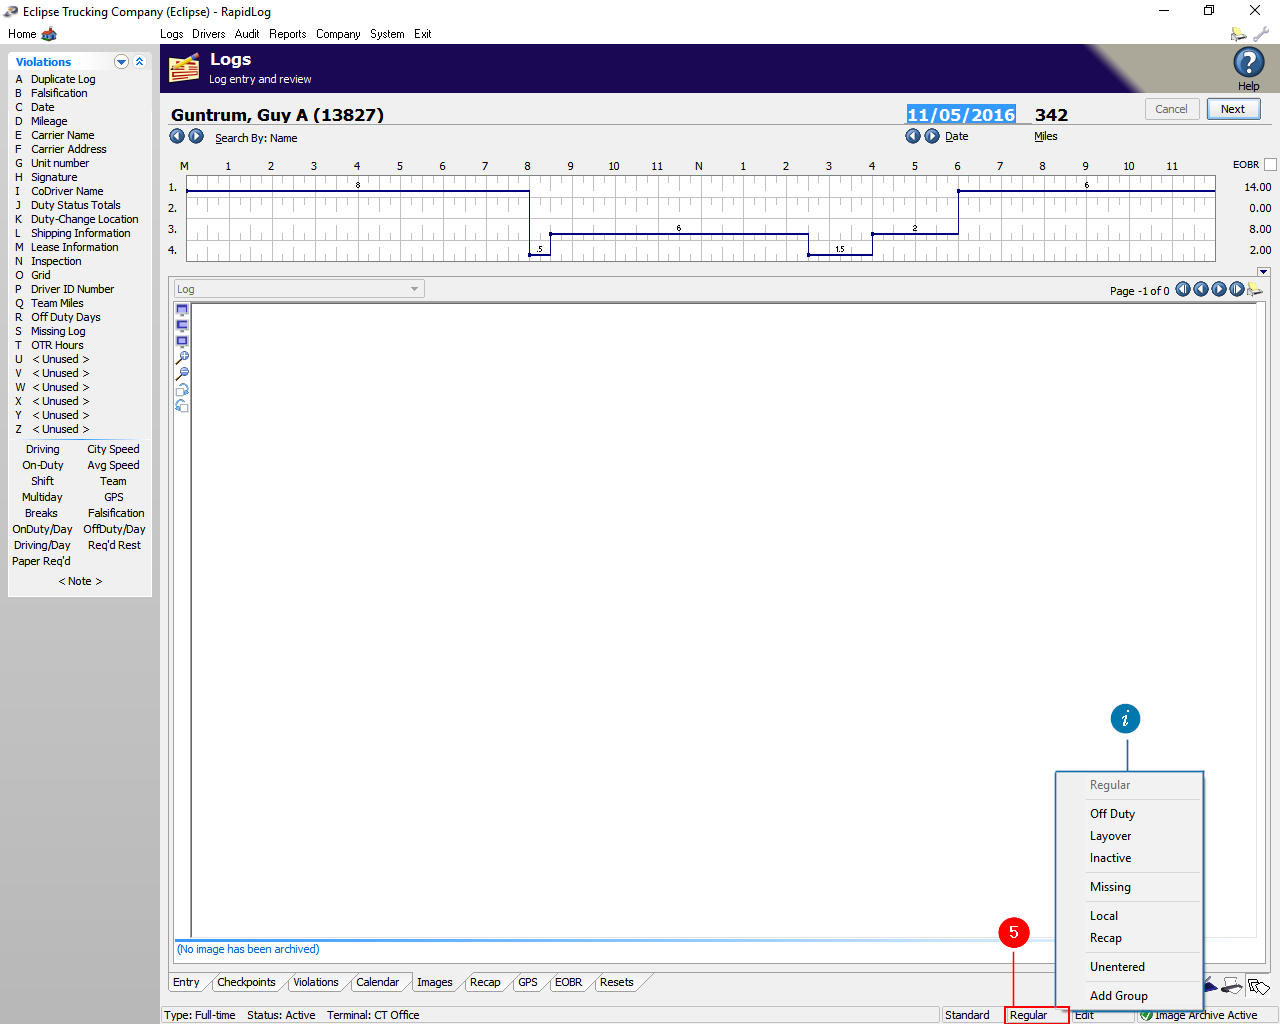
Step 5: Click the ‘Regular’ button at the bottom right, then select ‘Unentered’ to clear the log data.
Info: You have other options besides ‘Unentered’ if you don’t need to fully remove the log.
Connecting to Live Chat
Topic:
How do I connect with a RapidLog technician to get support through live chat?
Instructions:
- Click on the My Account page.
- Type in your credentials and click Login.
- Info: If you are already logged in you can skip this step.
- Hover over Support option in the Menu bar.
- Click on the Live Chat option.
- Info: It will show either OnDemand or Self-Hosted depending on your subscription.
- Fill out your contact information and click on the Submit button
- Click on the ‘Click Here to Start Your Chat Session Now!’ link.
- Google Chrome – Click the ‘Open Citrix Online Launcher’ button.
- Mozilla Firefox – Click the ‘Open Link’ button.
- Internet Explorer – It should open up automatically. If it doesn’t click on the ‘download & run GoToAssist Corporate’ option and then run the program.
- Microsoft Edge:
- Click on the ‘Save’ button down below.
- Click on the ‘Run’ button after the download has finished.
- Click on the ‘Yes’ button when Windows asks you if you want to run the program.
- Note: At this point the install should be finishing up and connecting you to a RapidLog technical support representative.
Instructions:
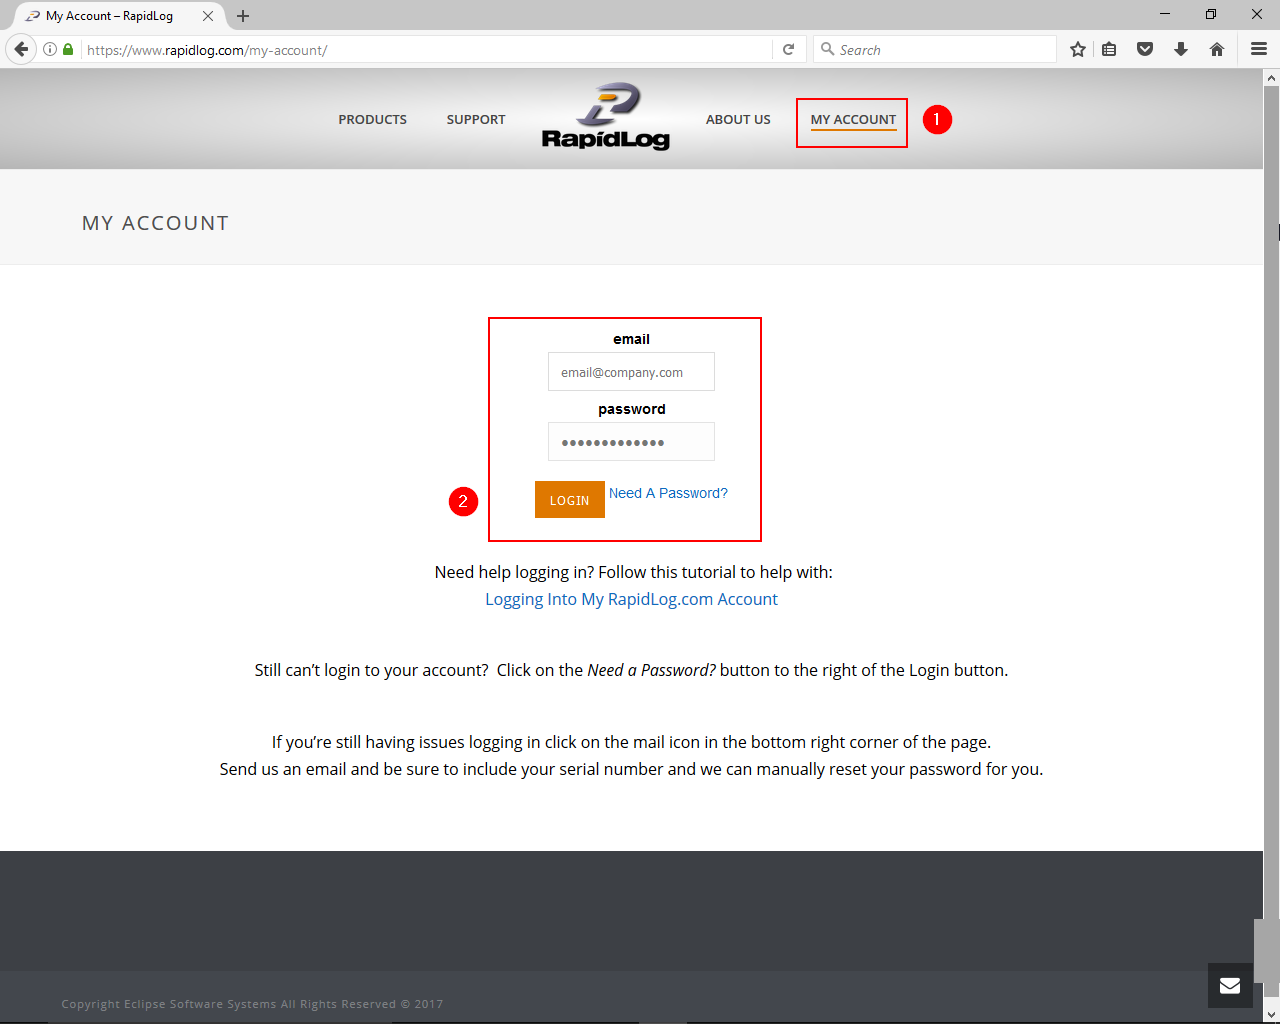
Step 1: Click on the My Account page.
Step 2: Type in your credentials and click Login.
Info: If you are already logged in you can skip this step.
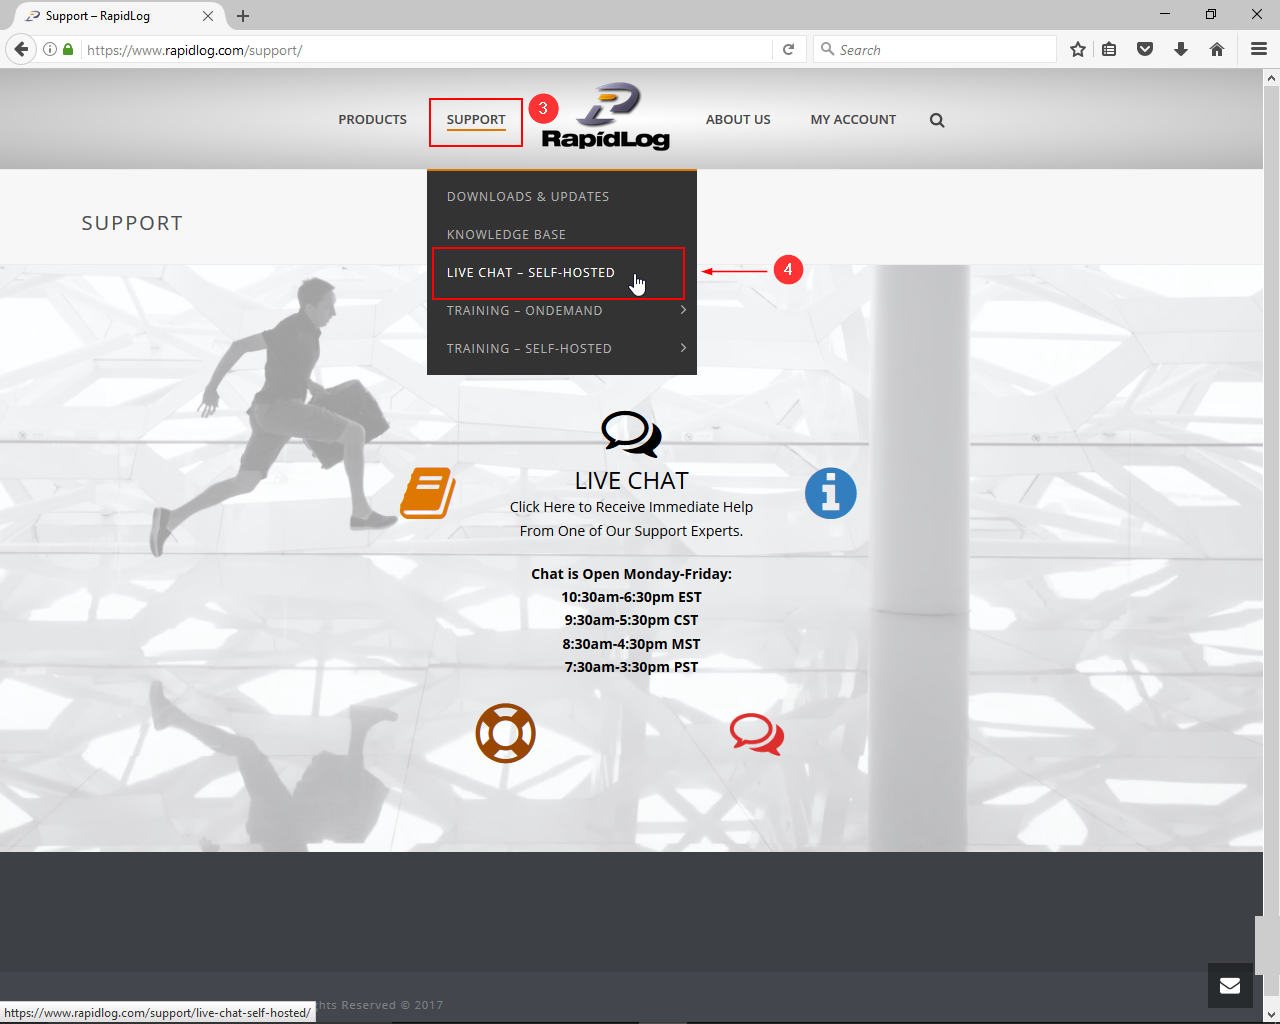
Step 3: Hover over Support option in the Menu bar.
Step 4: Click on the Live Chat option.
Info: It will show either OnDemand or Self-Hosted depending on your subscription.
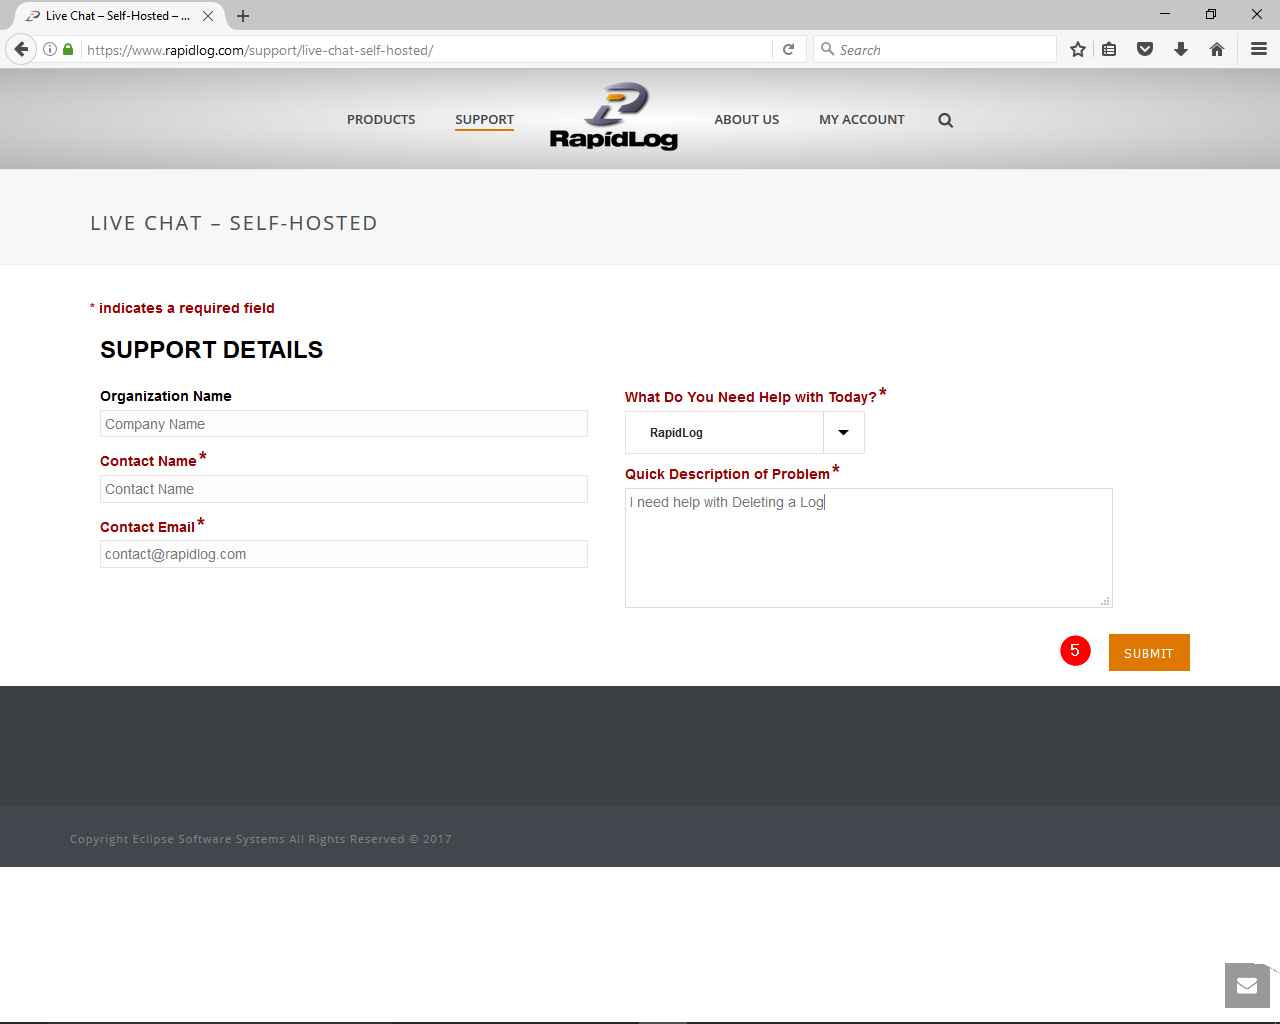
Step 5: Fill out your contact information and click on the Submit button.
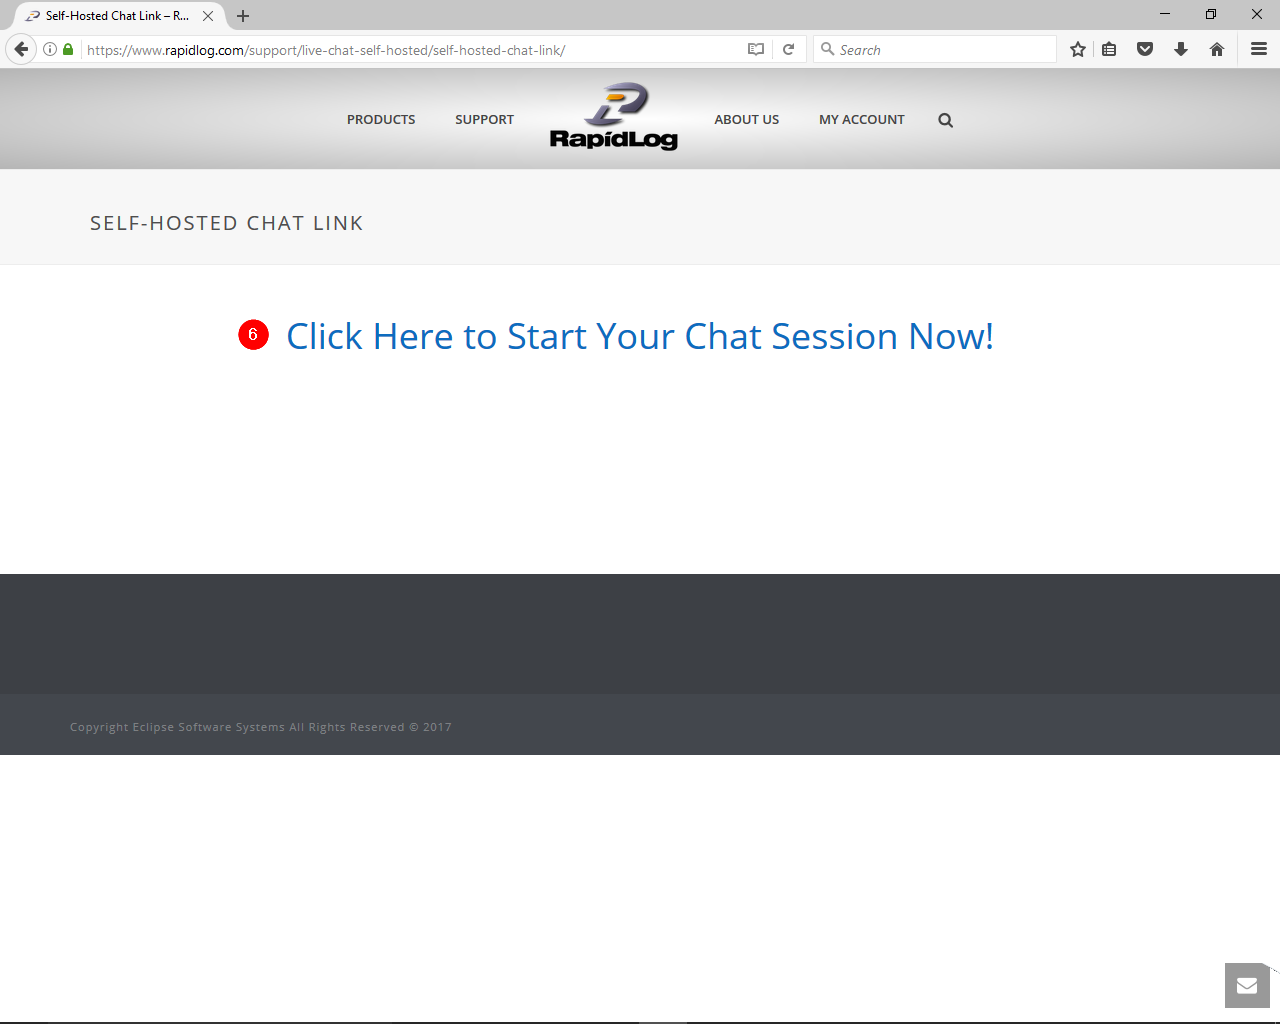
Step 6: Click on the ‘Click Here to Start Your Chat Session Now!’ link.
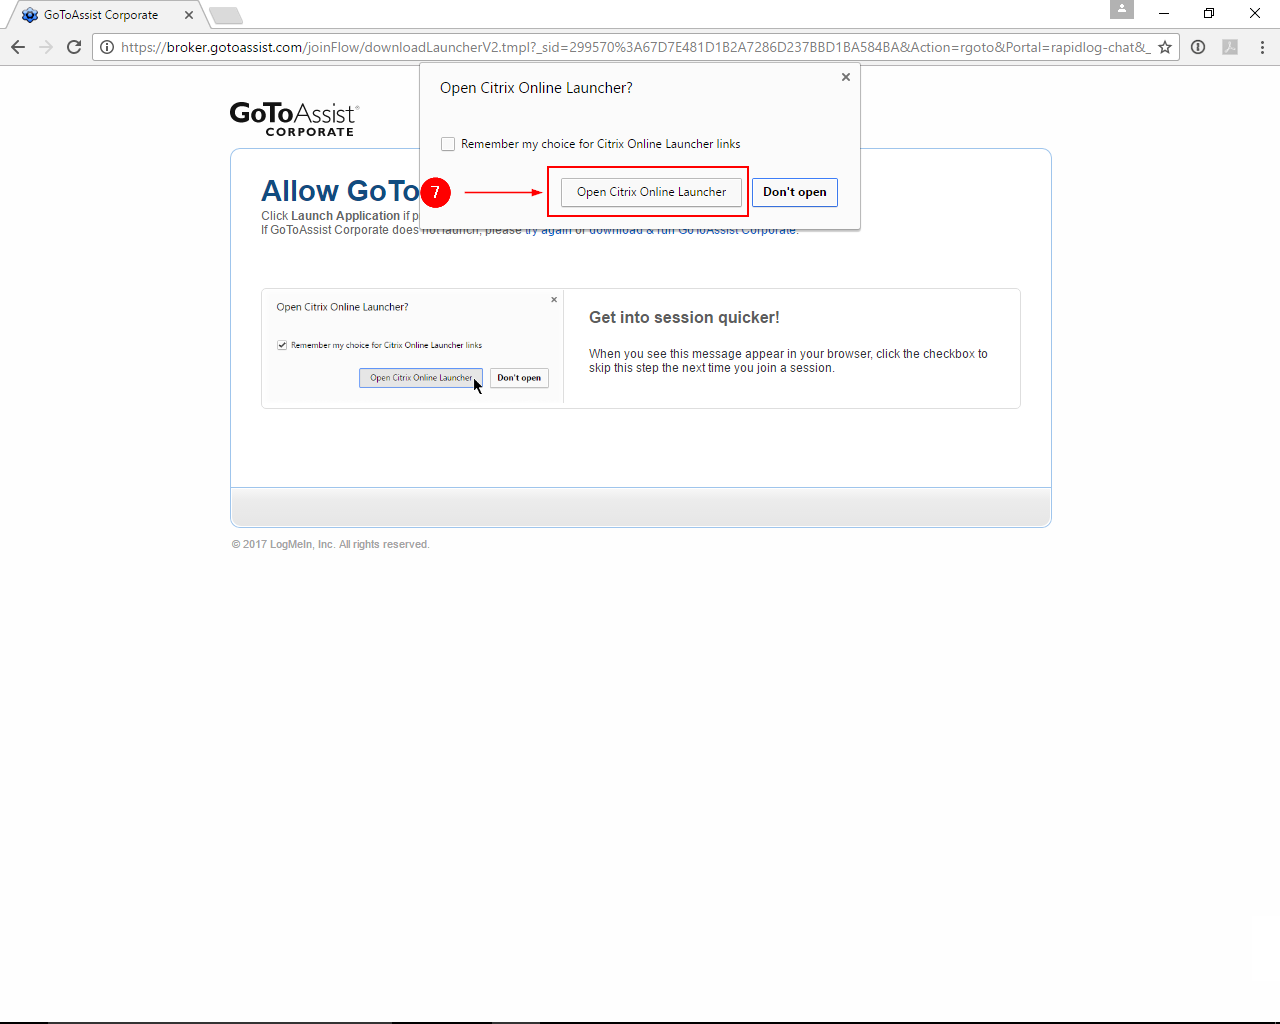
Step 7 – Google Chrome: Click the ‘Open Citrix Online Launcher’ button.
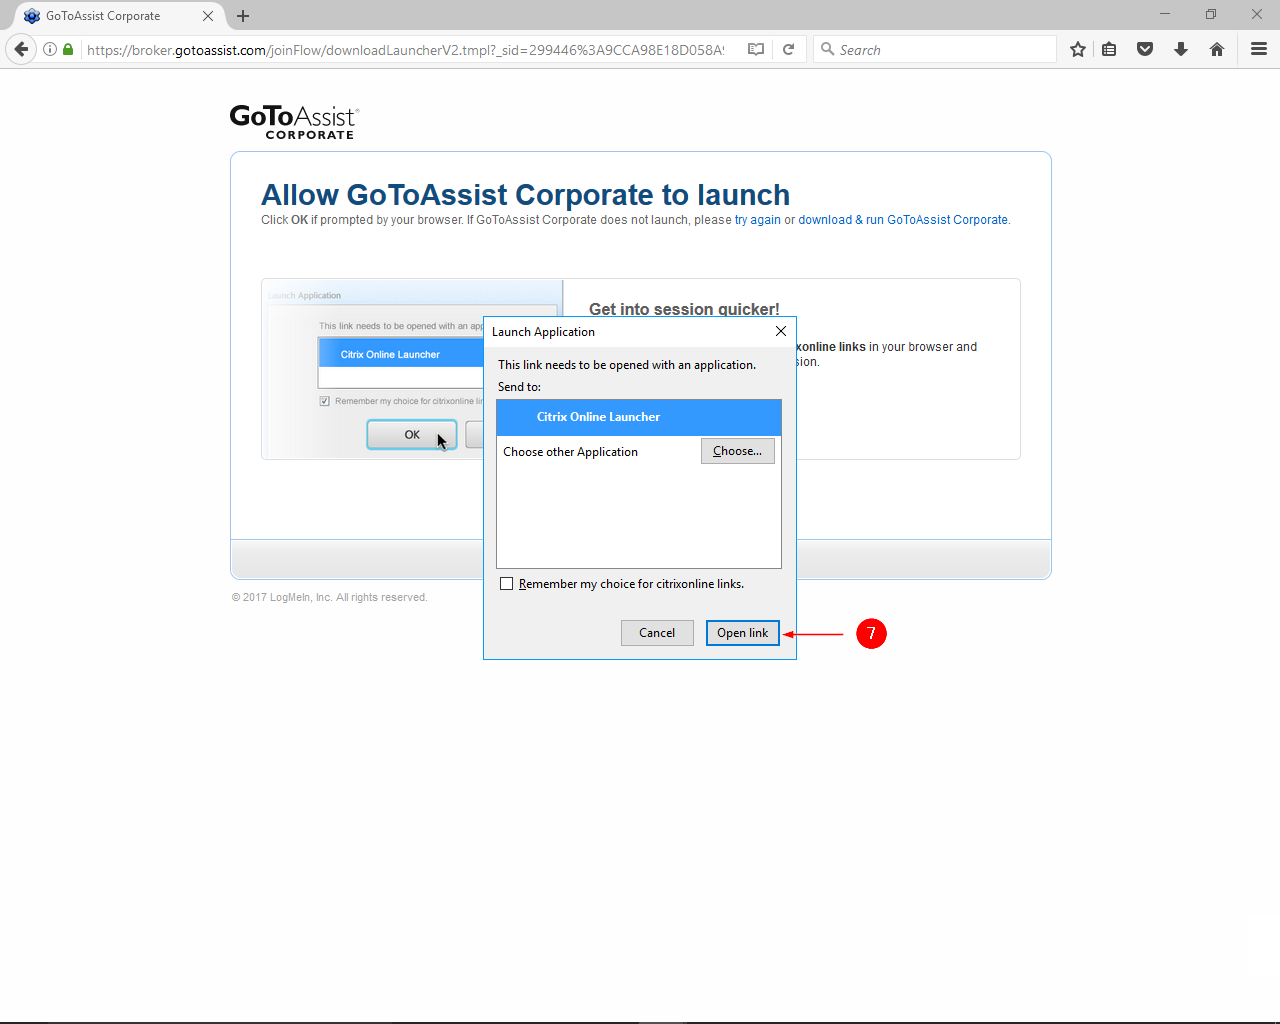
Step 7 – Mozilla Firefox: Click the ‘Open Link’ button.
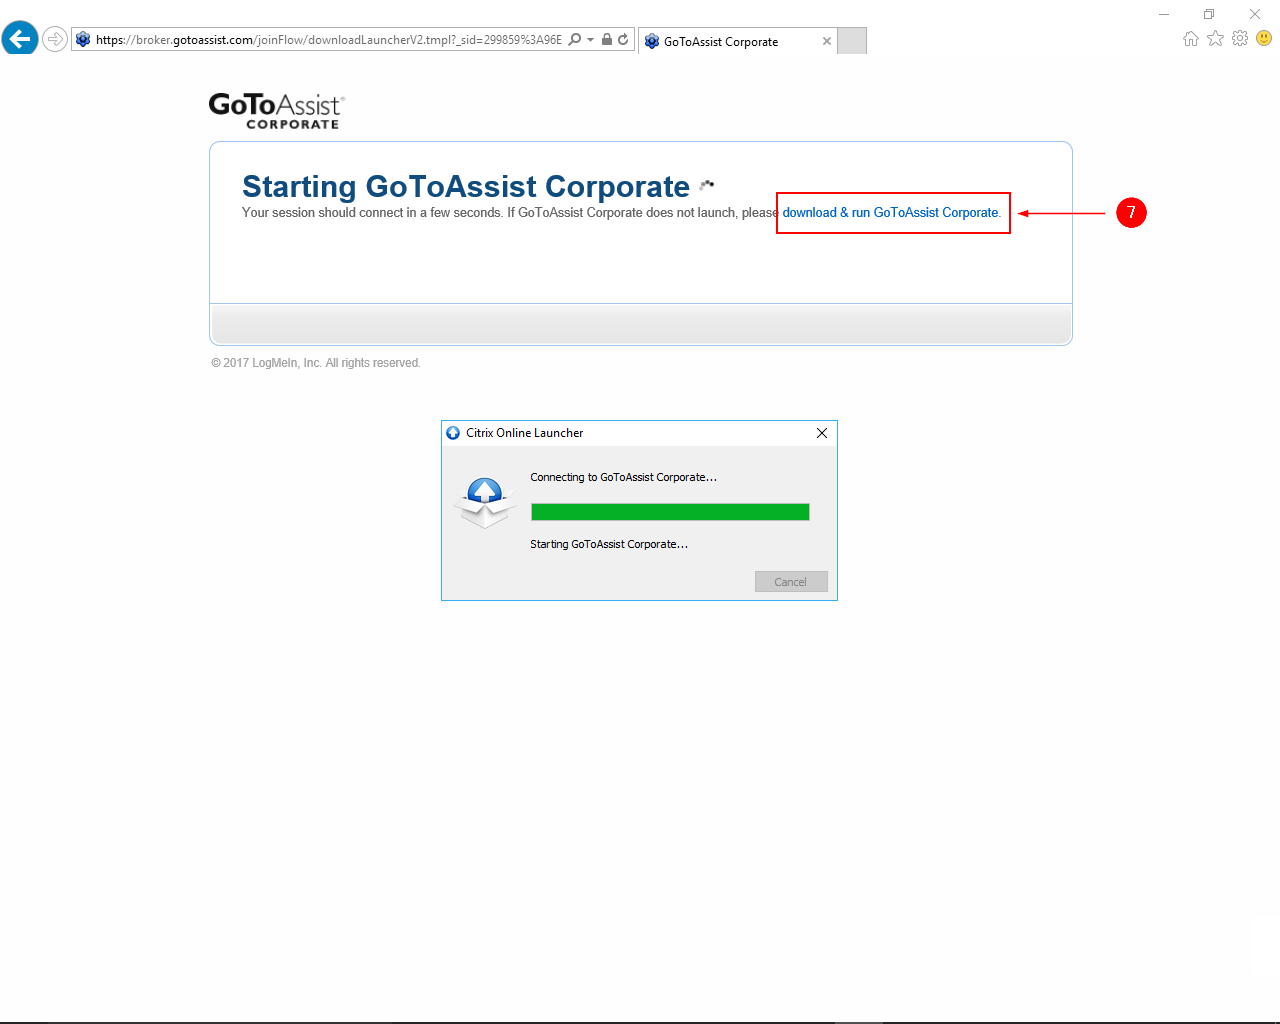
Step 7 – Internet Explorer: It should open up automatically. If it doesn’t click on the ‘download & run GoToAssist Corporate’ option and then run the program.
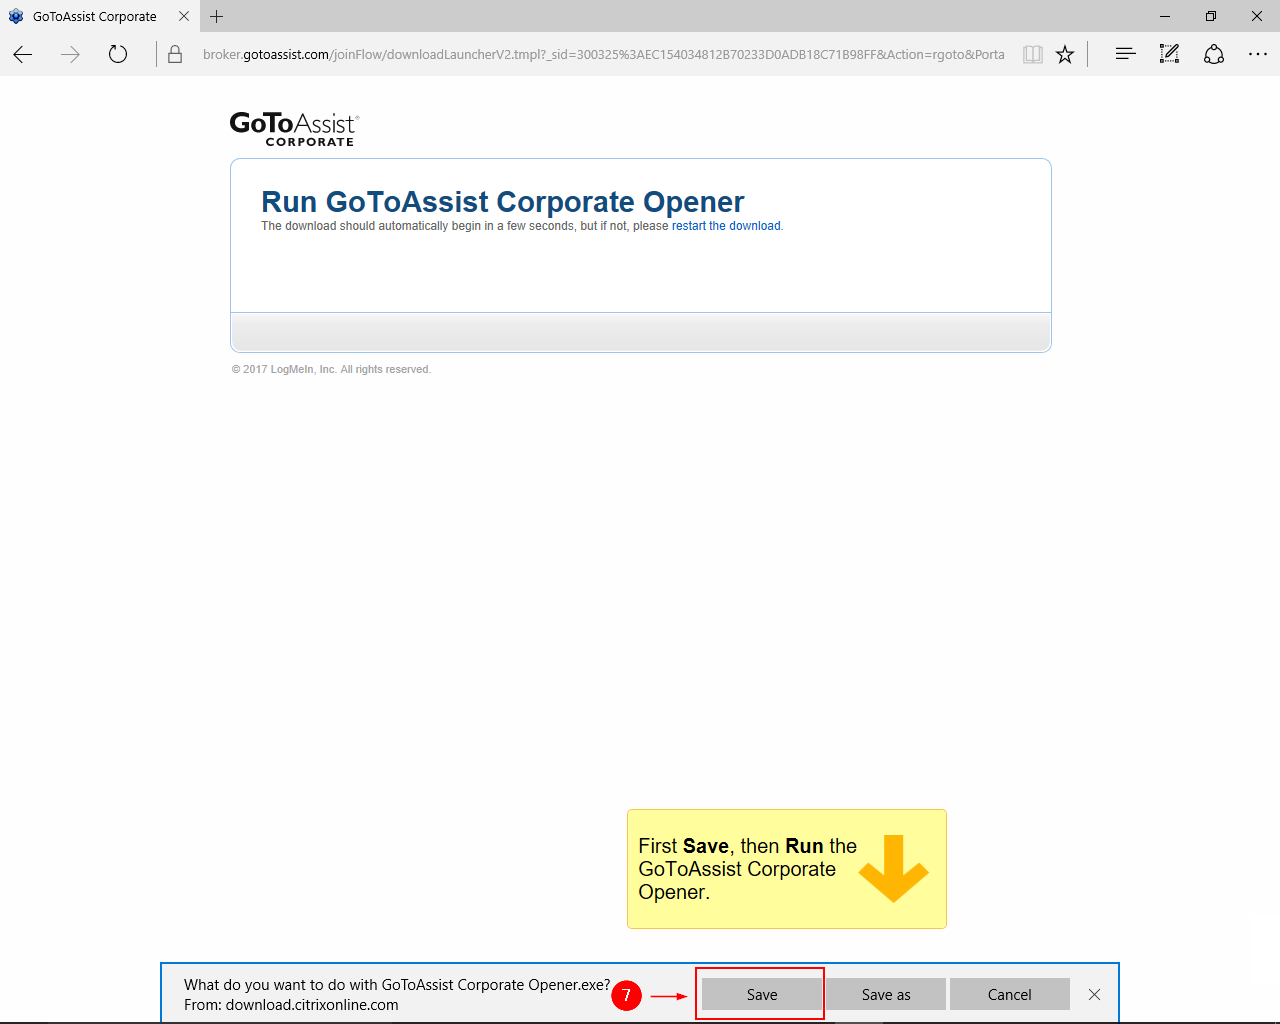
Step 7 – Microsoft Edge: Click on the ‘Save’ button down below.
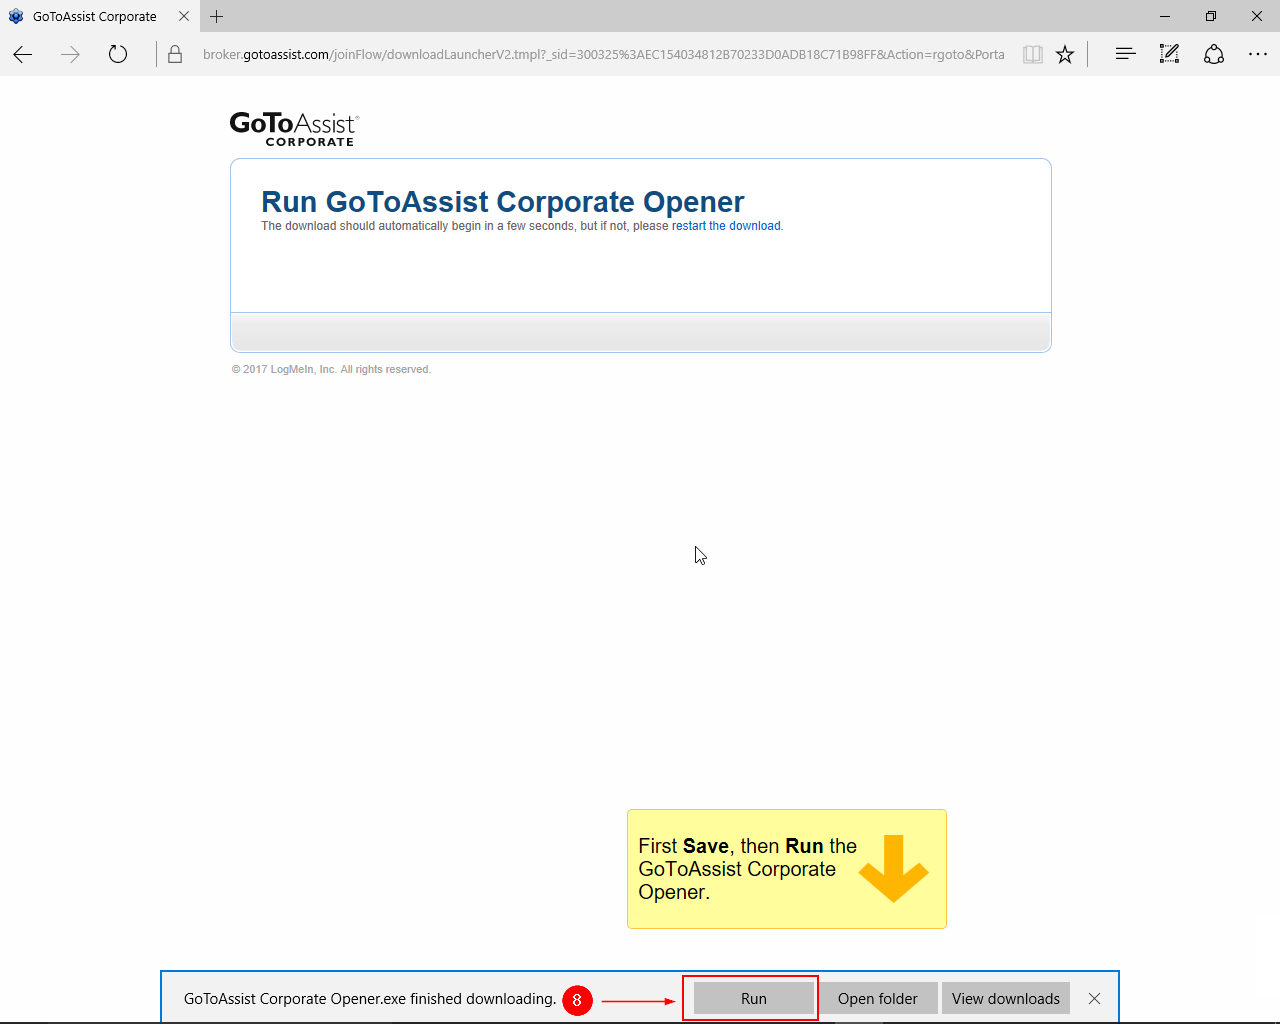
Step 8 – Microsoft Edge: Click on the ‘Run’ button after the download has finished.
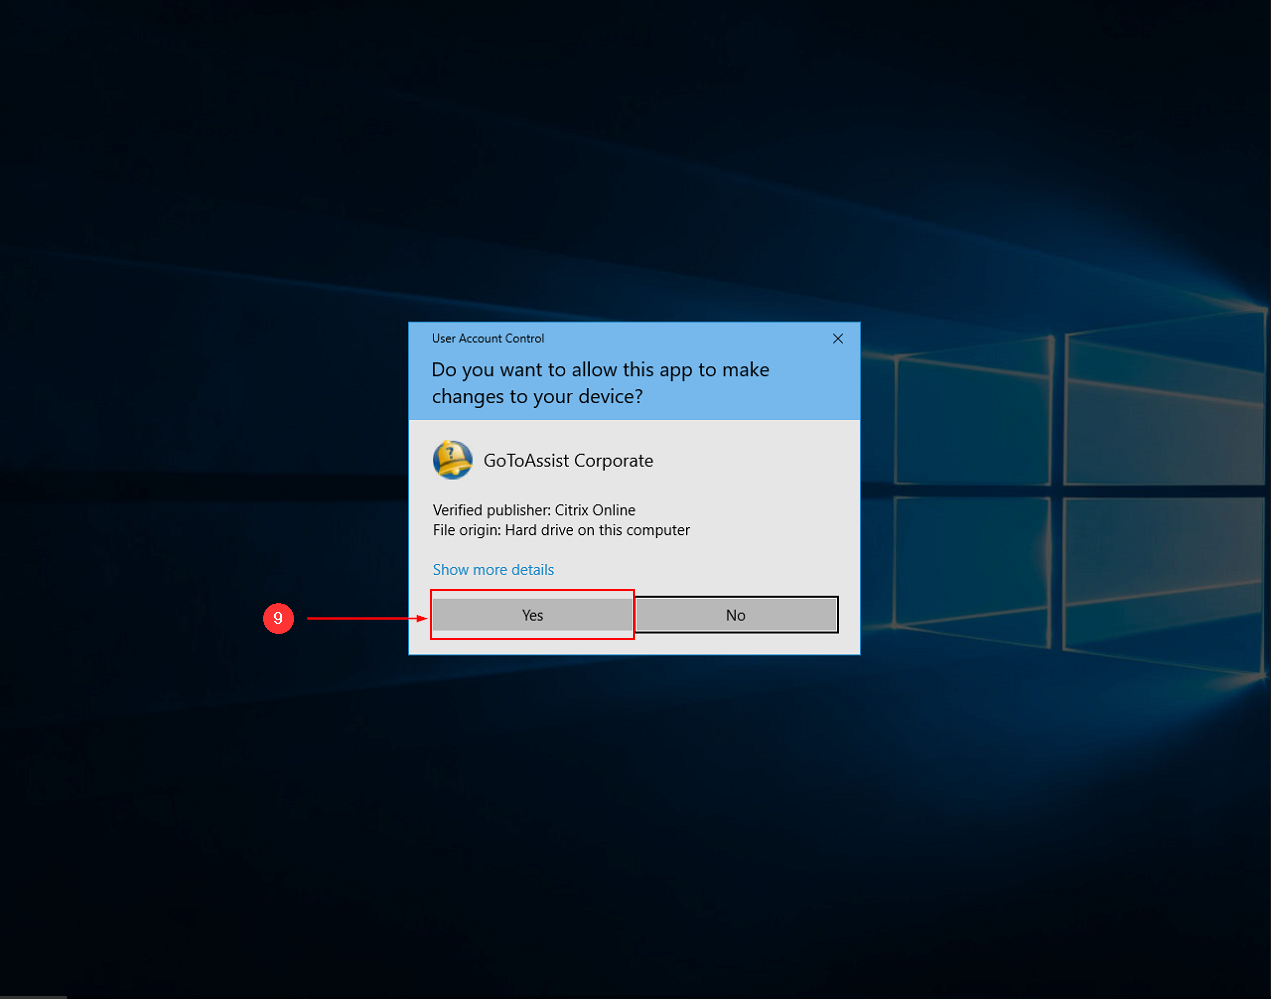
Step 9: Click on the ‘Yes’ button when Windows asks you if you want to run the program.
Note: At this point the install should be finishing up and connecting you to a RapidLog technical support representative.
Logs Page Calendar
Topic:
How can I skip to a different day, on the logs page, quickly without having to type it in?
Instructions:
- Click on the ‘Logs’ page.
- Click the ‘Calendar’ tab at the bottom.
- Here you can change the Month, Day, and year you want to view.
- Add Group allows you to add a group of logs for a date range.
- Info: The logs Calendar allows you to move to dates quickly on one driver. It also allows you to add multiple log types to a date range.
Instructions with Images:
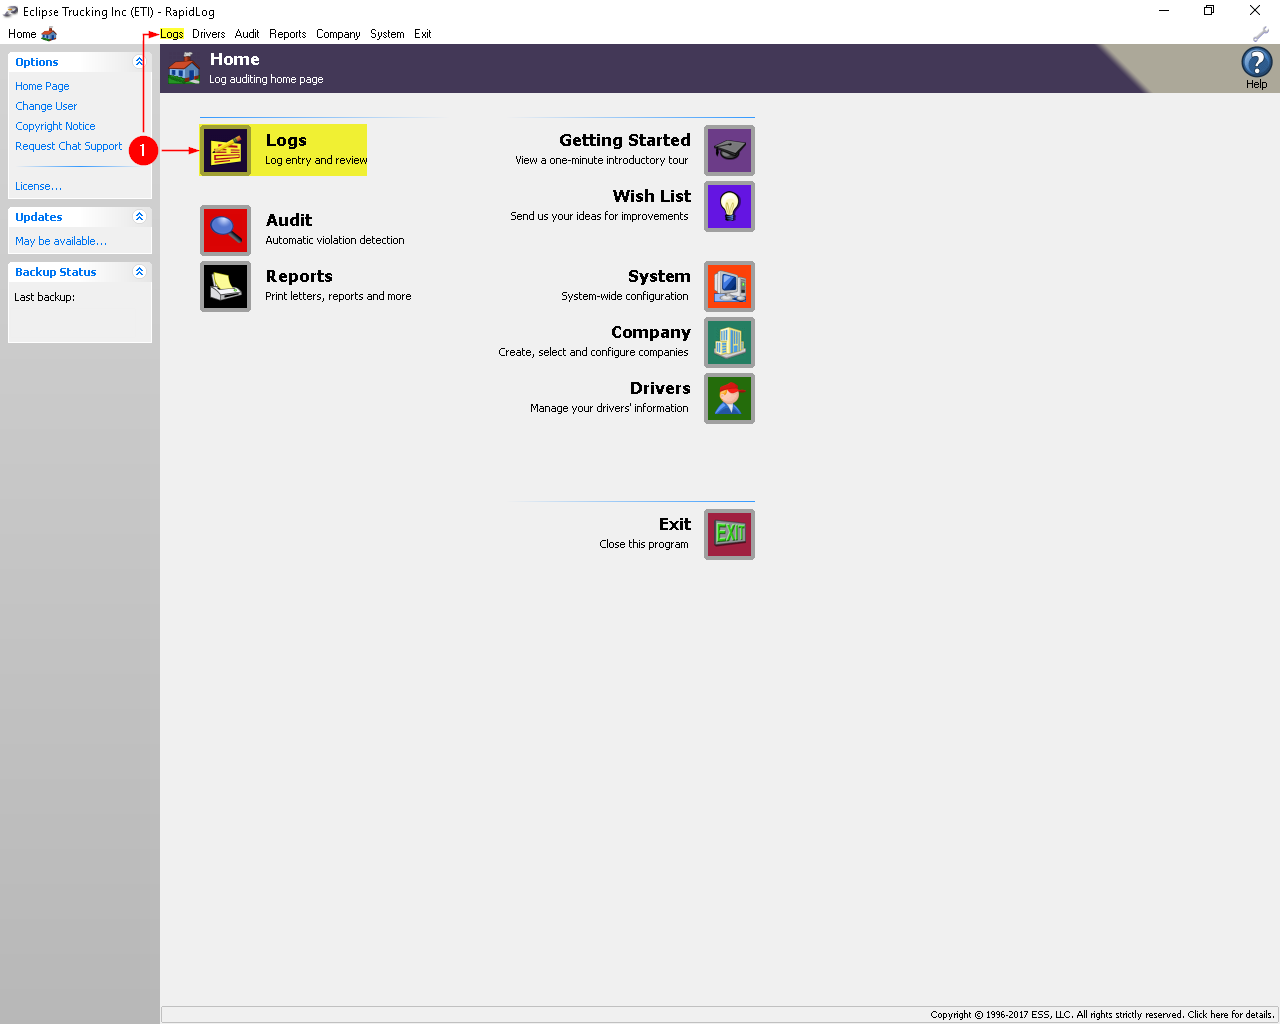
Step 1: Go to the ‘Logs’ page.
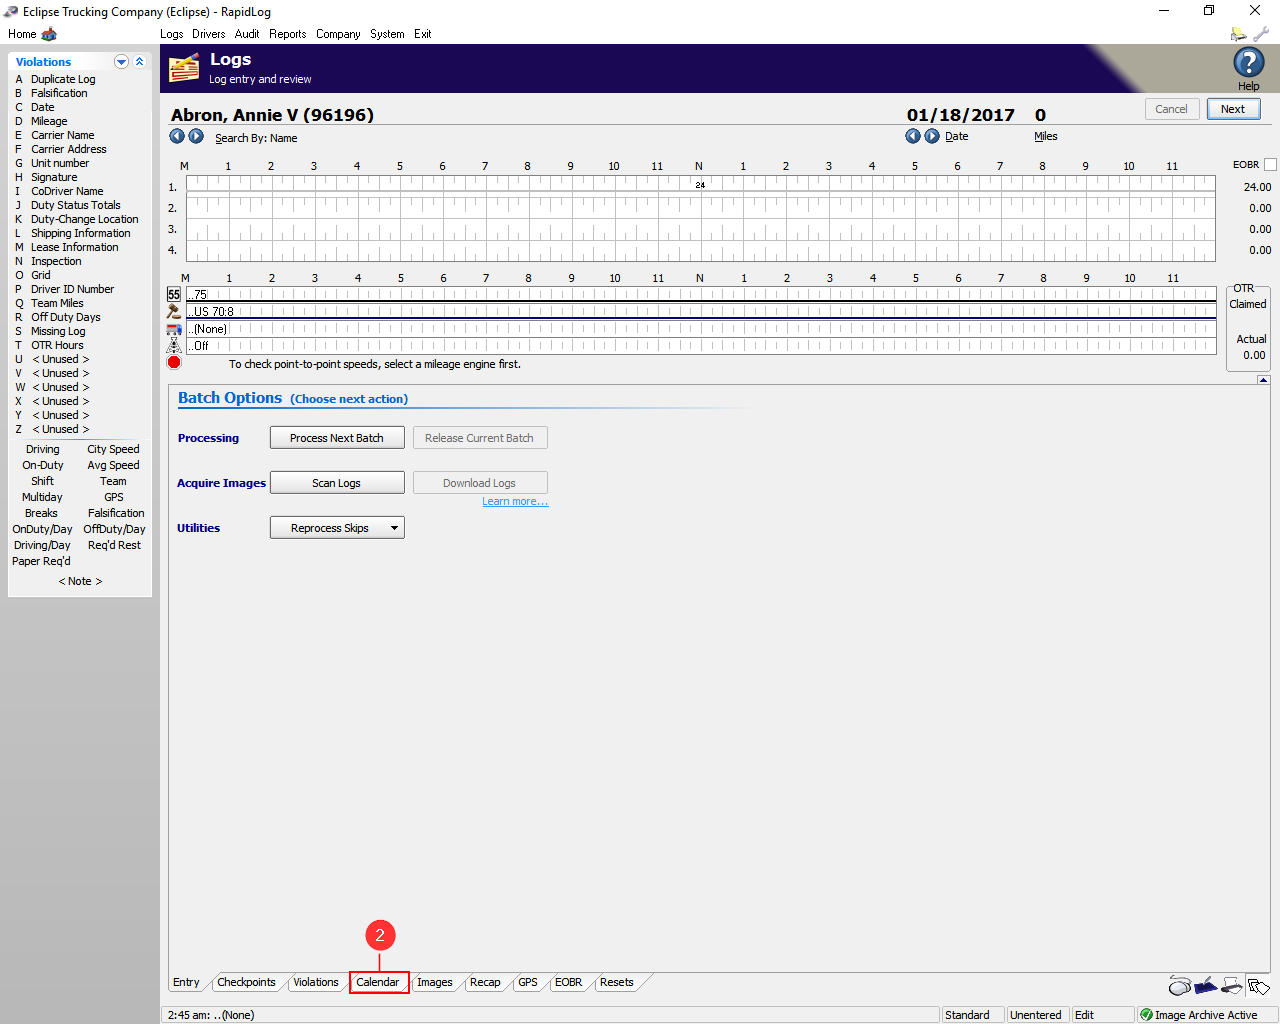
Step 2: Click the ‘Calendar’ tab at the bottom.
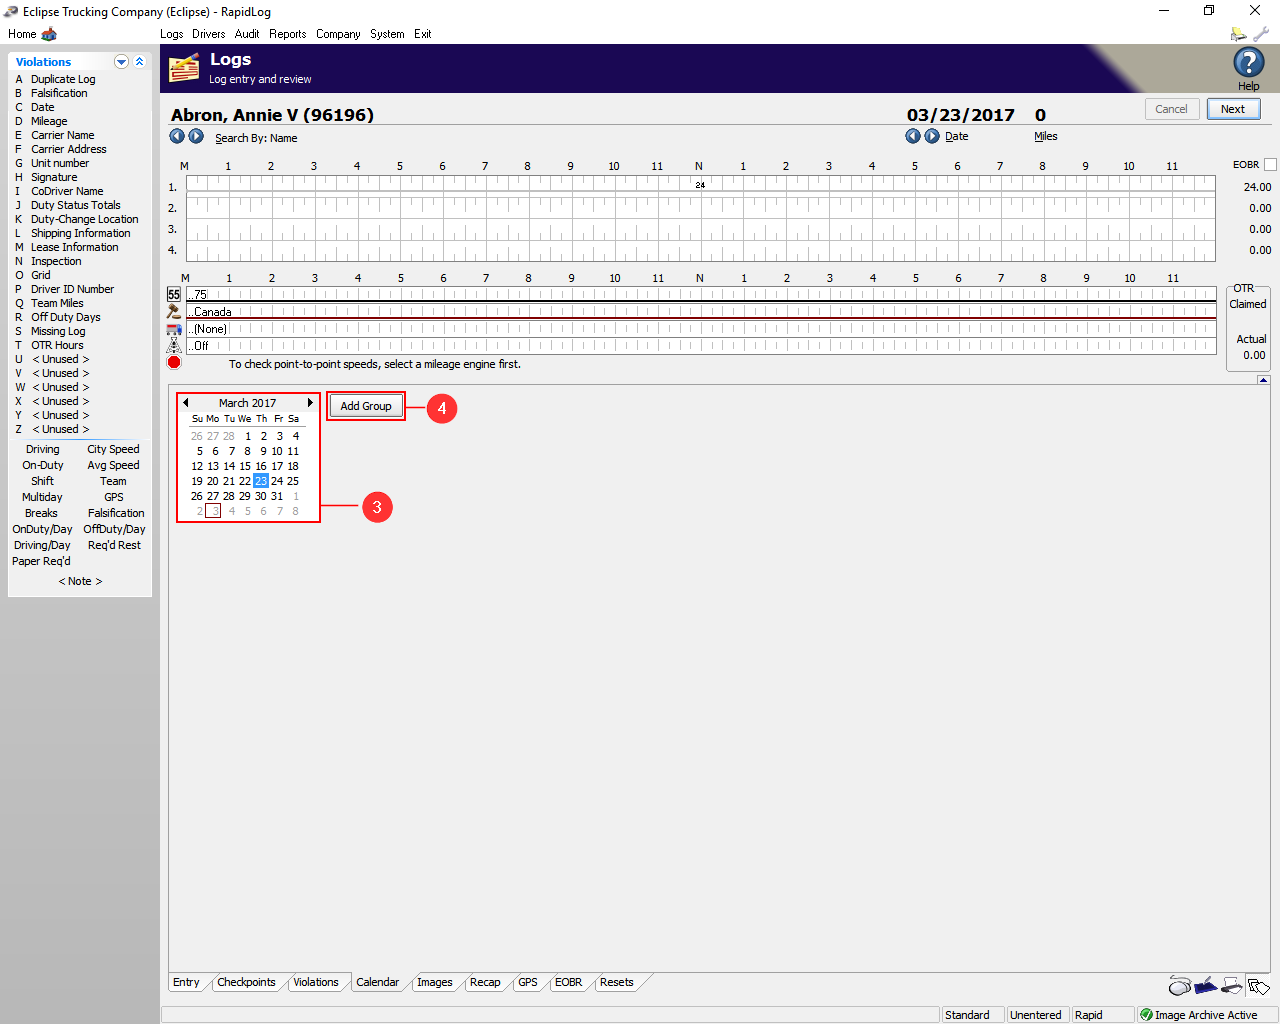
Step 3: Here you can change the Month, Day, and year you want to view.
Step 4: Add Group allows you to add a group of logs for a date range.
Info: The logs Calendar allows you to move to dates quickly on one driver. It also allows you to add multiple log types to a date range.
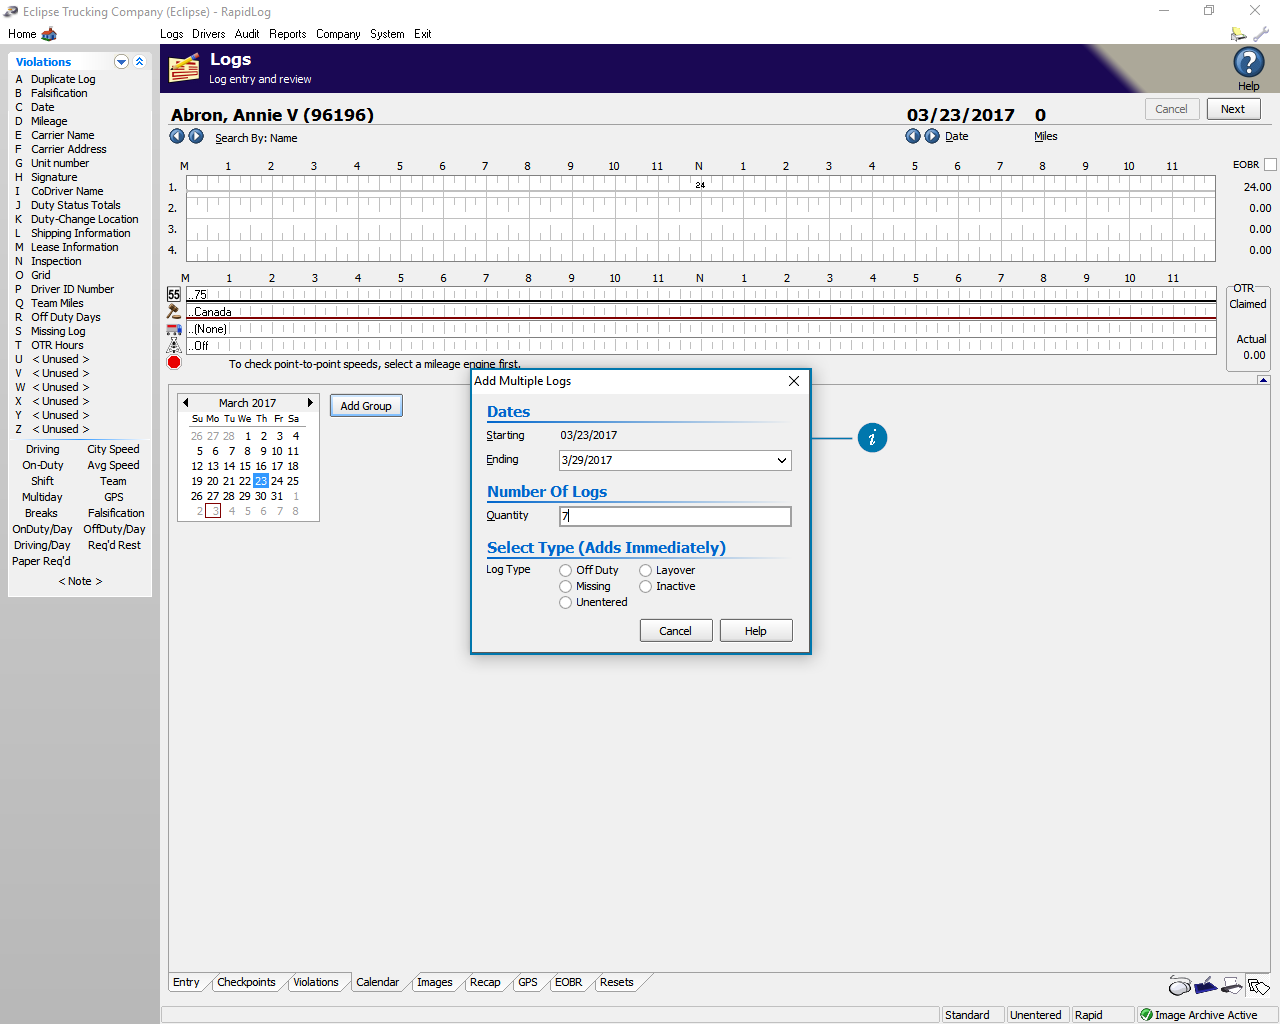
Add Group Example: The driver is inactive for 7 days, from 3/23 – 3/27. First enter the date range, the hit the ‘Tab’ key on your key board, this will fill in the ‘Quantity’. Next select the log type you would like to add. Rapidlog will automatically add that log type to the date range you selected.
Purge Log & Driver Data
Topic:
How do I purge out old logs and driver data?
Instructions:
- Go to the company page in Rapidlog, then click on the purge button on the left side.
- Click Purge. Depending on how much data you have it would take a while for the purge to complete, and Rapidlog may say “Not Responding”, don’t worry it is still working.
- Info: Rapidlog allows you to choose how many months of data you would like to keep. By defalut it is set to 6. Also note that you have the option to delete terminated driver. You can also choose how long the driver has to be terminated for before Rapidlog deletes them.
Instructions with Images:

Step 1: Go to the Company page in Rapidlog

Step 2: Click on the Purge button on the left side.

Step 3: Click Purge. Depending on how much data you have it would take a while for the purge to complete, and Rapidlog may say ‘Not Responding’, don’t worry it is still working.
Info: Rapidlog allows you to choose how many months of data you would like to keep. By defalut it is set to 6. Also note that you have the option to delete terminated driver. You can also choose how long the driver has to be terminated for before Rapidlog deletes them.